Game: Shin Megami Tensei: Strange Journey Redux.
Location: Womb of Grief.
Here you can find full maps for Womb of Grief, including Sanctum A and B, plus marked routes for some tough parts and my recommendations. After finishing WoG you can use my Empyrean Ascent maps.
⚠️ Notes
My maps show full floors because I finished the game and completely cleared them. But, just like Schwarzwelt sectors, most of them cannot be finished or even accessed in one sitting. There is even a unique type of invisible floors which need own sub-app to walk on them. I don’t remember the exact requirements for separate zones, so I mapped everything I see in my saved game.
For smooth walkthrough make sure to develop and equip the following sub-apps as early as you can:
- maximum Gate Search, Unlock, Enemy Search
- Medic / Doctor Magus – mitigates damage and ailments from special floors
- Omen Bug – warns you about trapdoors and teleports
- Guidance Angel – shows teleport destination
The forma for some of these sub-apps is obtained within Womb of Grief. If you need help with Ex-Missions, check out my guide. If you can’t find forma/apps there, they are in Main Mission.
The best time to approach Womb of Grief is when you are close to the neutral ending in Sector Horologium. This ending is neutral. Of course, you need to be on New Game+. You can hang around WoG anytime, just to beat/recruit different demons and explore, but you won’t make much progress.
I list names as they are spelled in the game, i.e. without articles. Whatever are the reasons for this spelling, I feel weird when I add something from myself, even if I have to use grammatically incorrect versions.
The Ingress
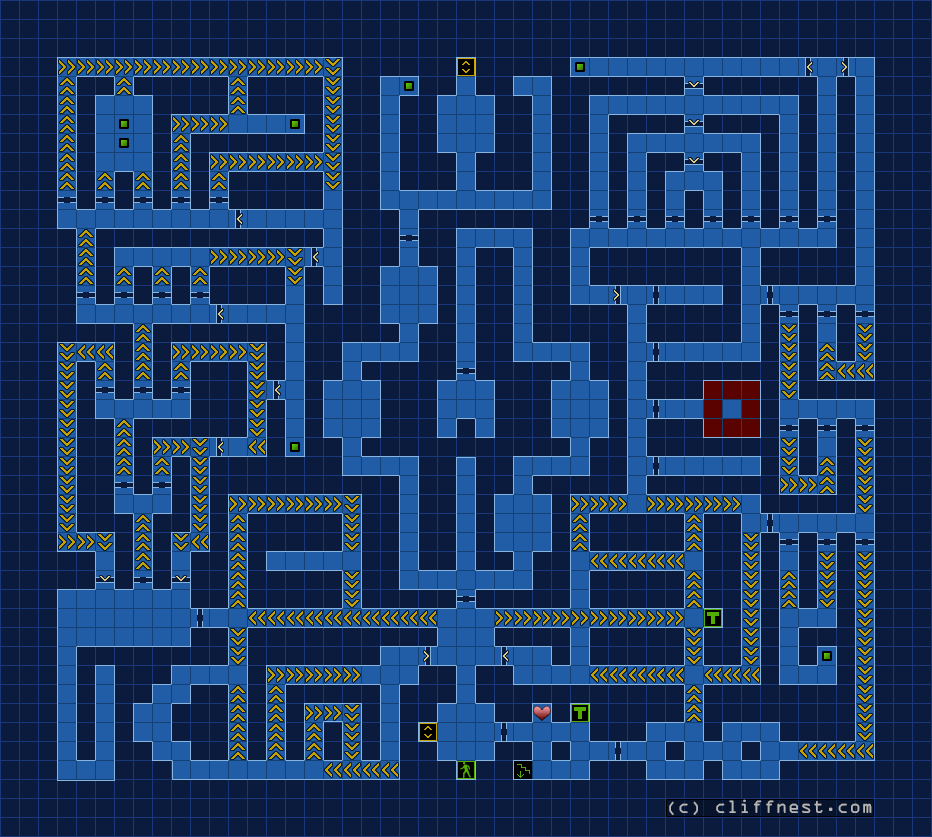
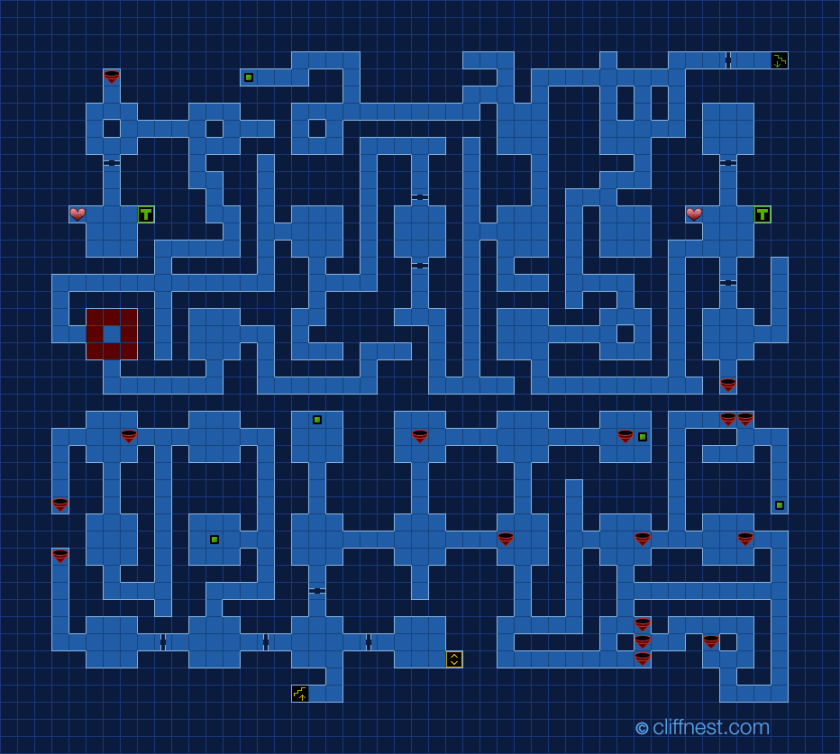
First Sphere
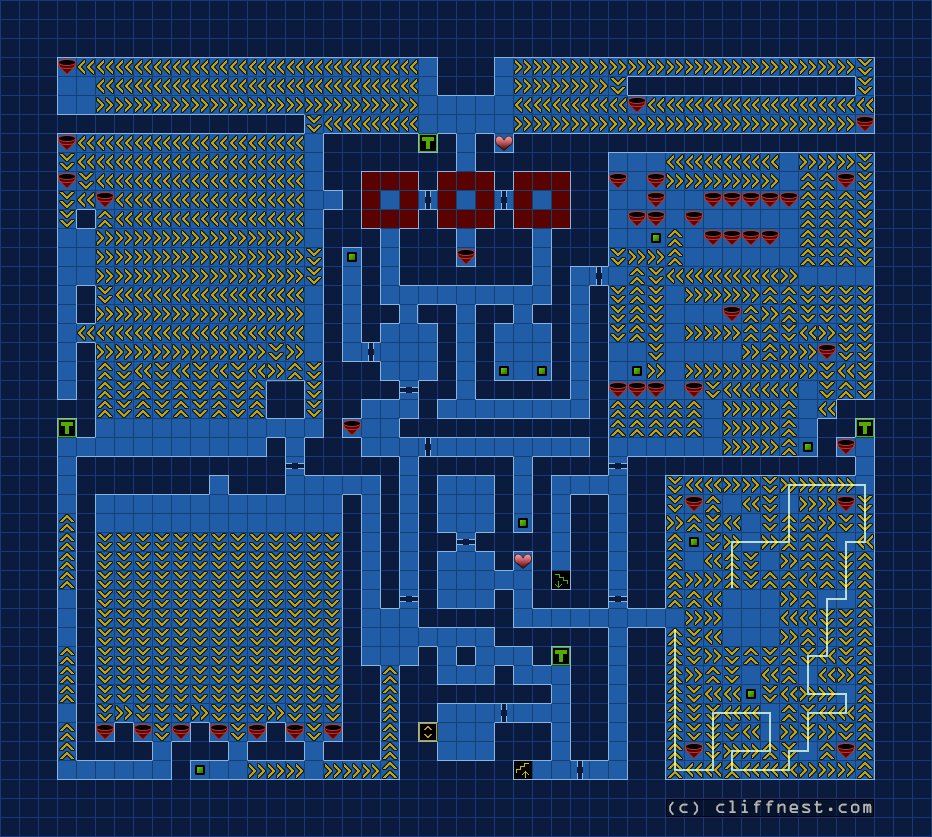
The route through southeast hall is marked on the map below.
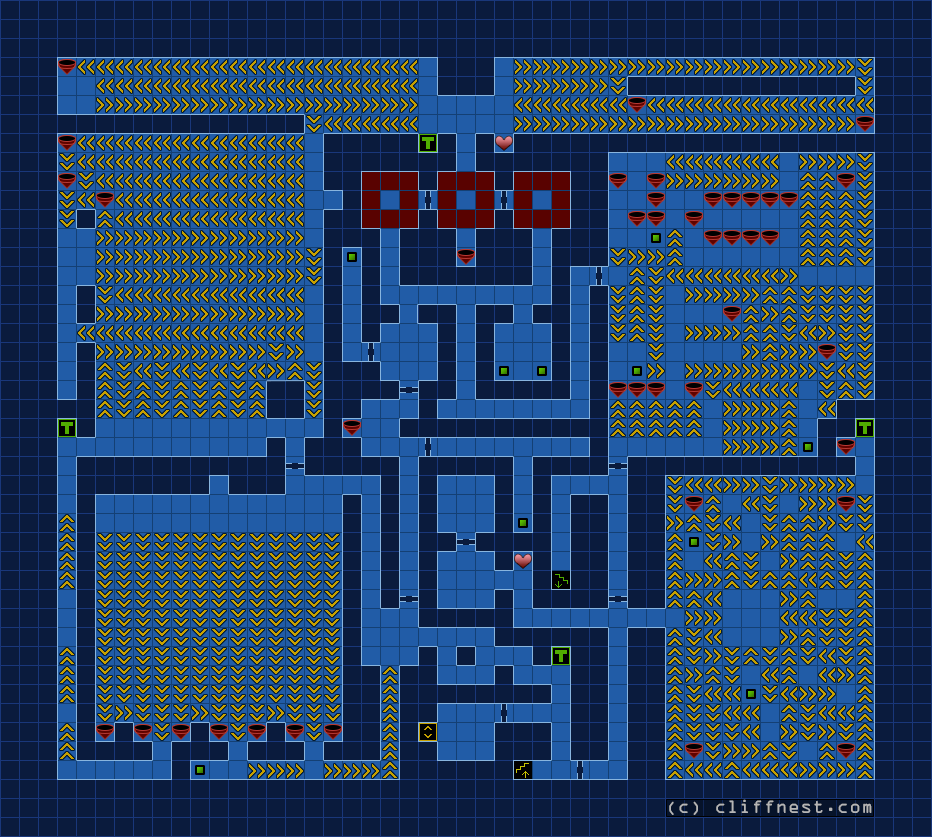
Second Sphere
Second Sphere is a huge relief after the first, since there are no teleporters or moving tiles. But it has a lot of trapdoors and the whole area is practically covered by various damage tiles. Omen Bug and Medic sub-apps can be extremely useful here. You might also want to keep demons with Posumudi and healing skills in your stock. If you don’t have these skills in the party, just buy a couple of cheap demons for backup and recover their SP with Chakra Pots.
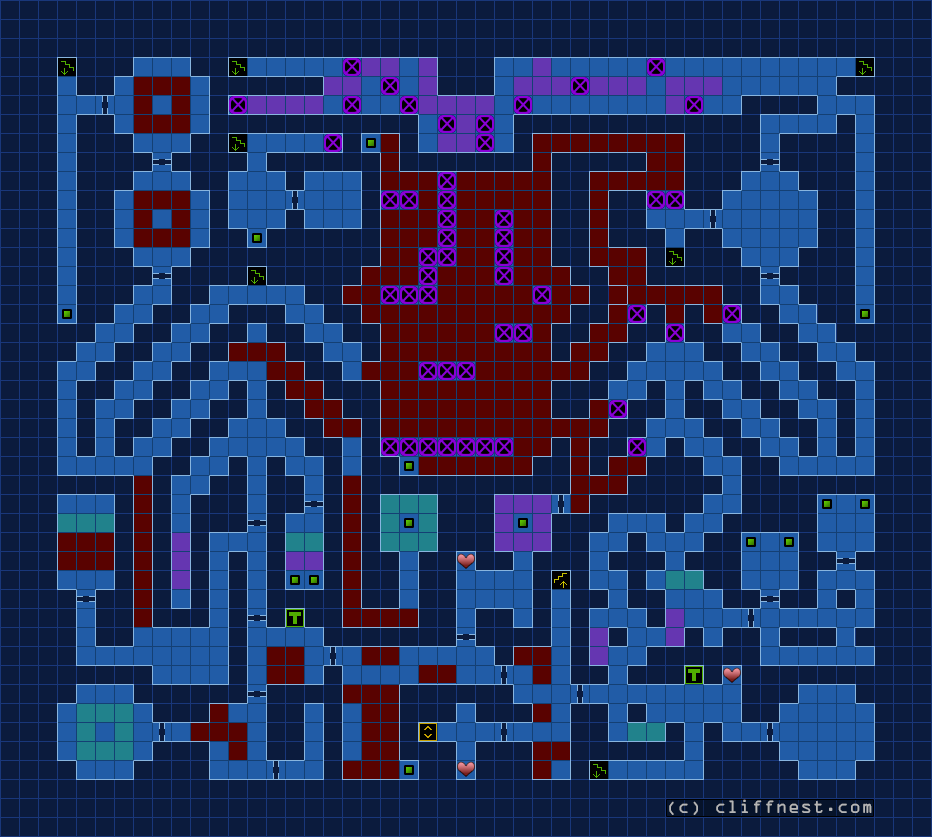
Third Sphere
Third Sphere is where things start to get interesting since you will encounter Alex multiple times here. Cutscenes and battles are aplenty, but the dungeon itself is rather straightforward. You will need to use phase shifters and navigate Sanctums. Some rooms can only be accessed via trapdoors in the Second Sphere.
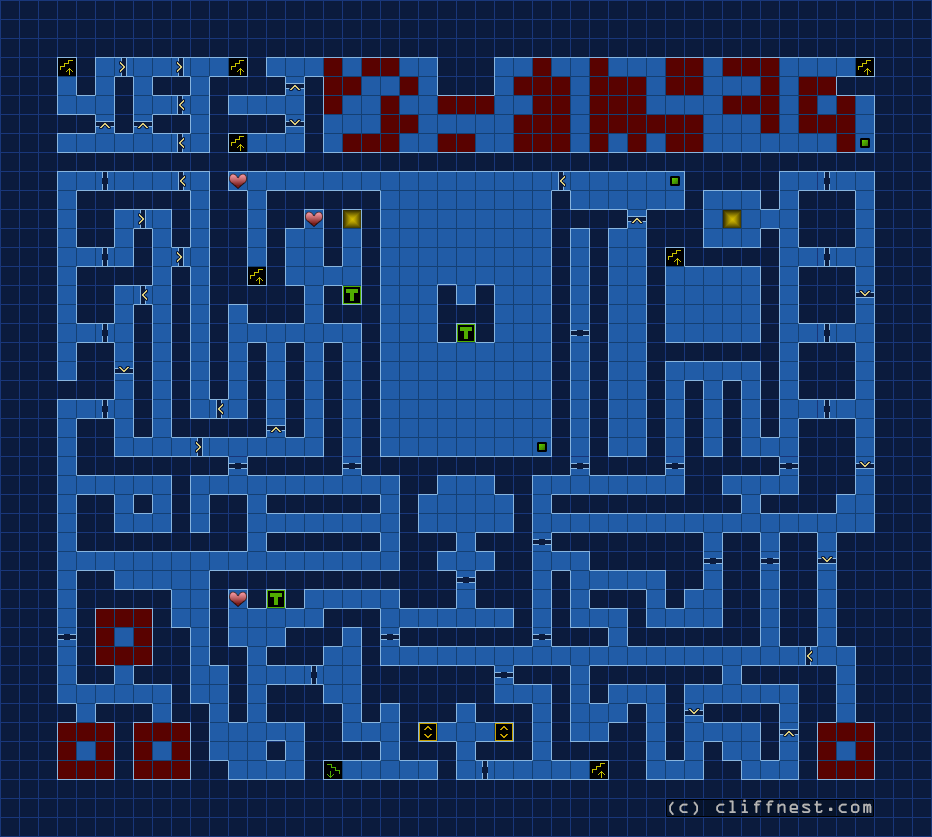
Sanctum A
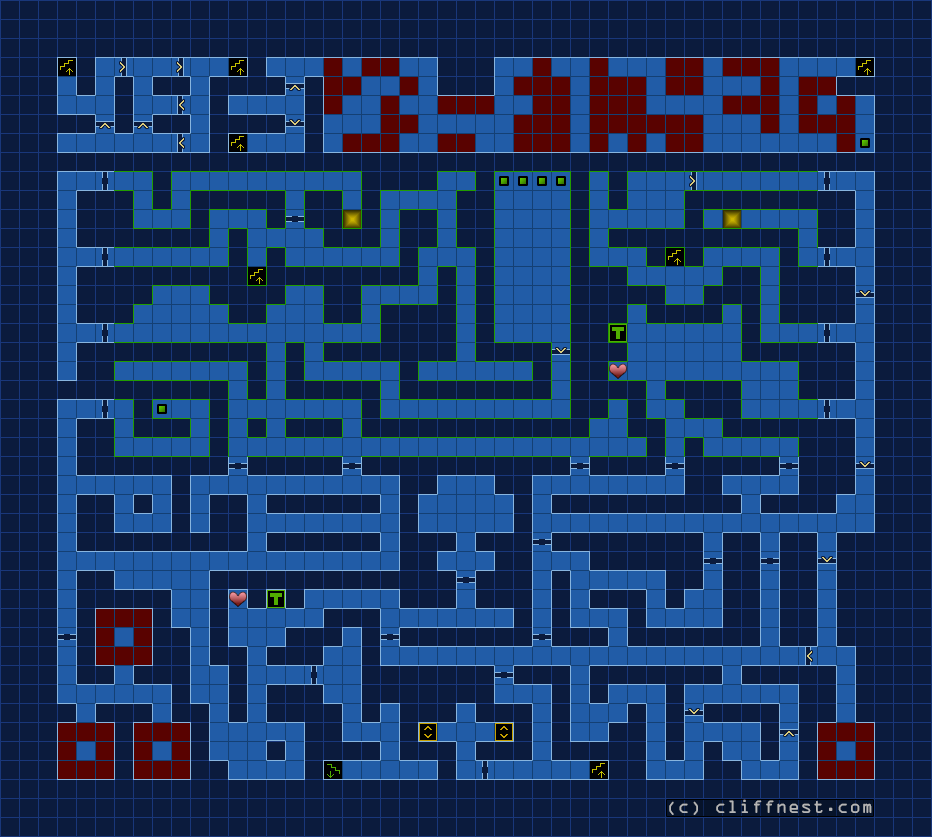
Sanctum B
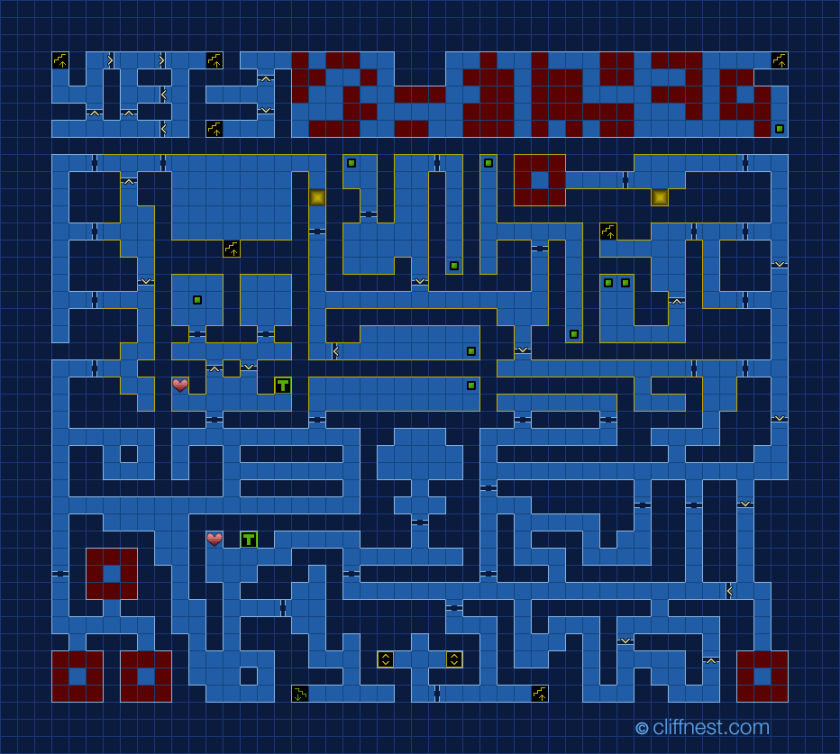
Fourth Sphere
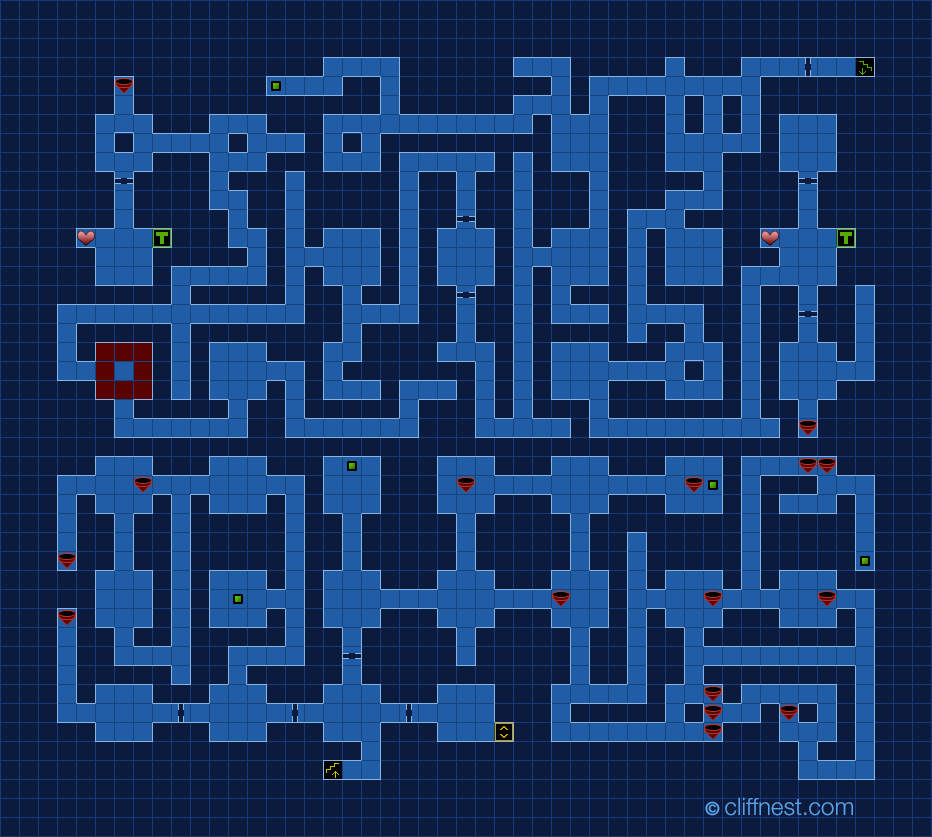
This should be a breeze after all you have gone through. This floor’s special feature is illusions. Relying on your vision no longer works because often you can’t see the path even when you look directly at it. Just try walking off cliffs. Or use the maps 😎
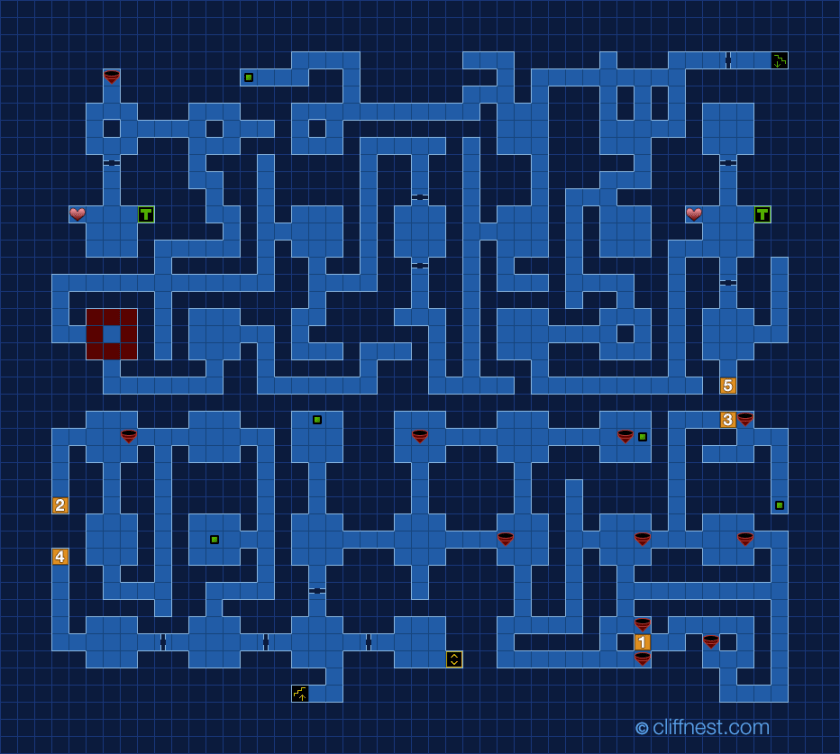
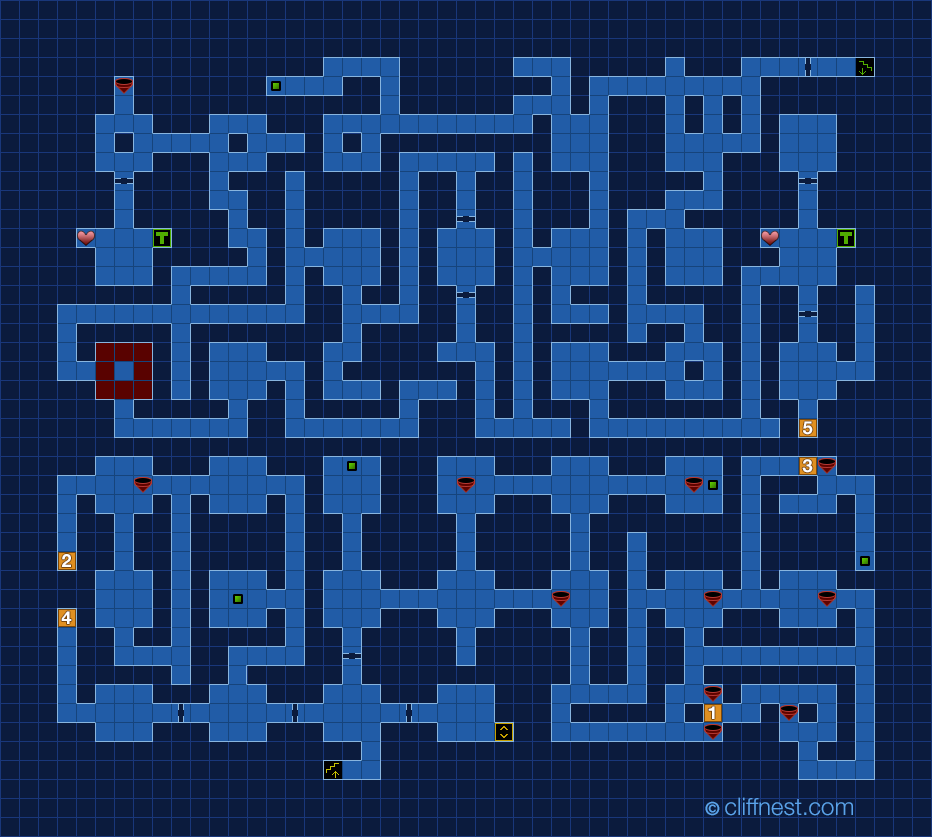
The only relatively tricky part is using teleports in the right order. For your convenience, I added another map where warps are numbered. Just you them in the specified order to get to the northern part and you should be fine.
Some parts of the floor are only visible via Floor Search sub-app. The chest in North West contains Naz sword (53×1-2, random, Paralyze). Not the most powerful, but this status effect might be very handy for another walkthrough.
Find the order of teleportation marked on the map below.
Fifth Sphere
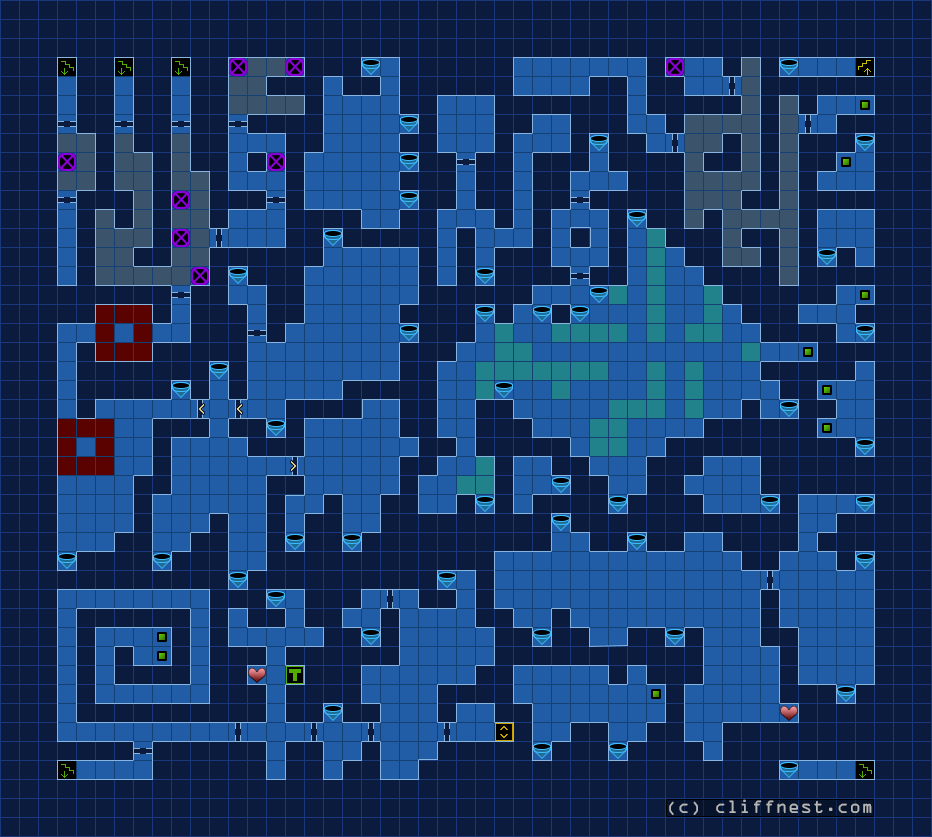
This floor may easily be the most sadistic dungeon I played in my life. It has rooms with irregular shapes and a myriad of conditional teleports. You need to pay attention to the number of flowers on each teleport. It can be from 0 to 6. You should use them in the order of their numbers: first the empty one, then 1, then 2, and so on until 6, then the cycle starts over. There is a couple of empty ones near the starting point which can be used to reset the count.
If you need to go to a certain point, you need to know what you are doing. One cycle usually gets you through one or two rooms, and then you have options, but not a lot of them. When I got to this floor I basically was wandering around aimlessly and unlocked most areas while figuring out what’s going on.
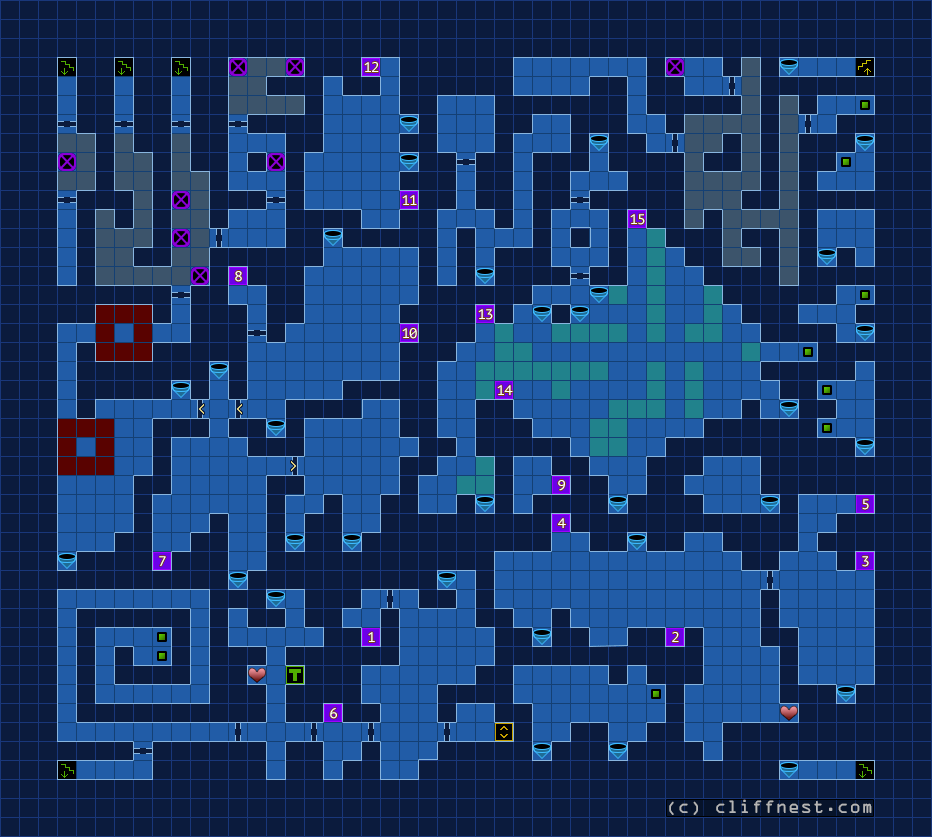
But you know what? I’m a very kind person and I made a route map in case you got stuck 👻
Find the route as numbered markers on the map below. This will get you to the areas required for plot progression.
Sixth Sphere
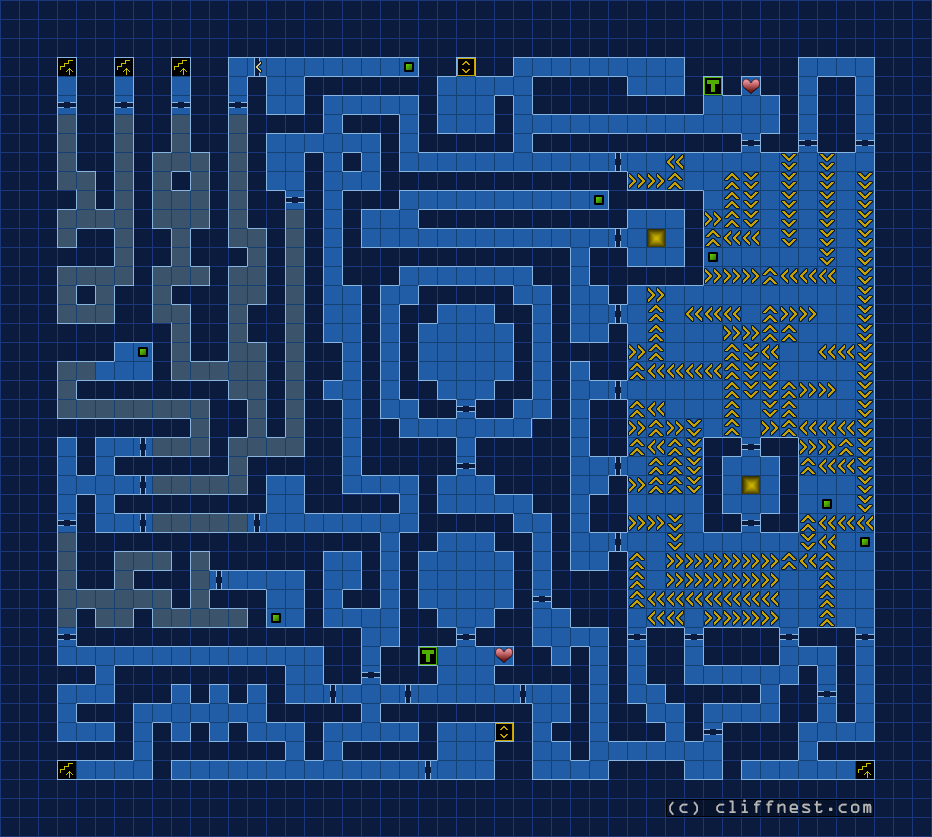
Sanctum A
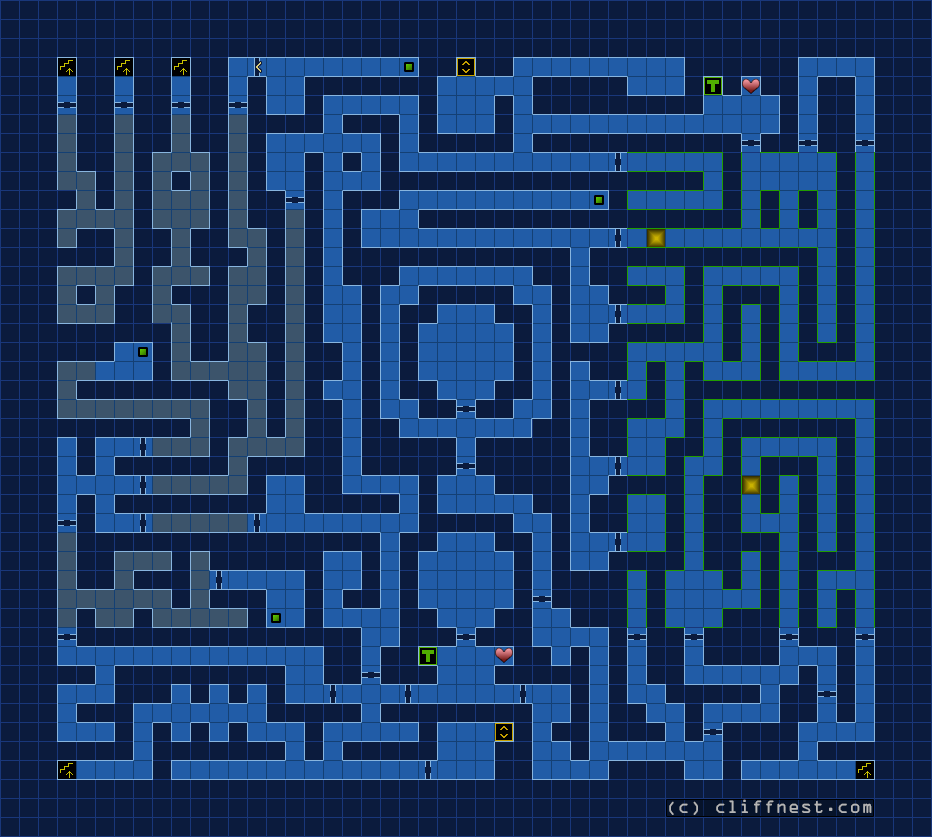
Sanctum B
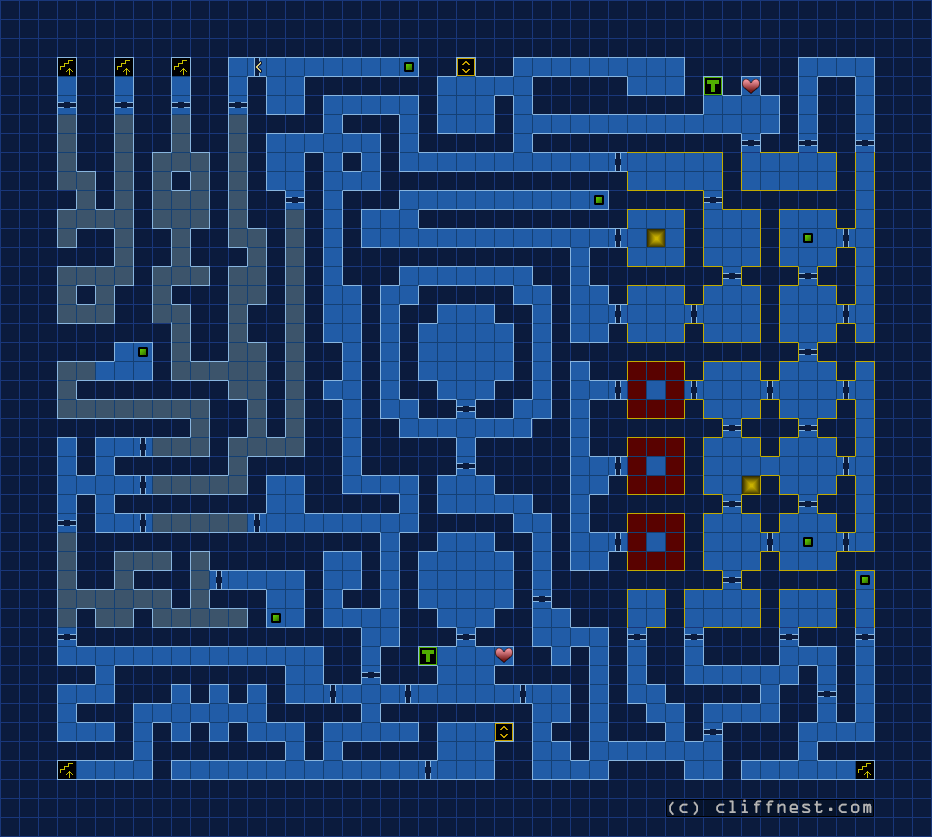
Congrats for getting this far!
Get some rest and check my Empyrean Ascent maps when you are ready to go.
Press F to Pay Respects

$1 = 1 respect
If my original content is any help to you, kindly consider donating a few coins. It will keep the website going!
$1.00
⚠️ WordPress killed some files for no reason (it’s supposed to host them? I’m far below the hosting limit). I replaced the maps, but if you see a broken link you can comment so that I re-upload it. Sorry.


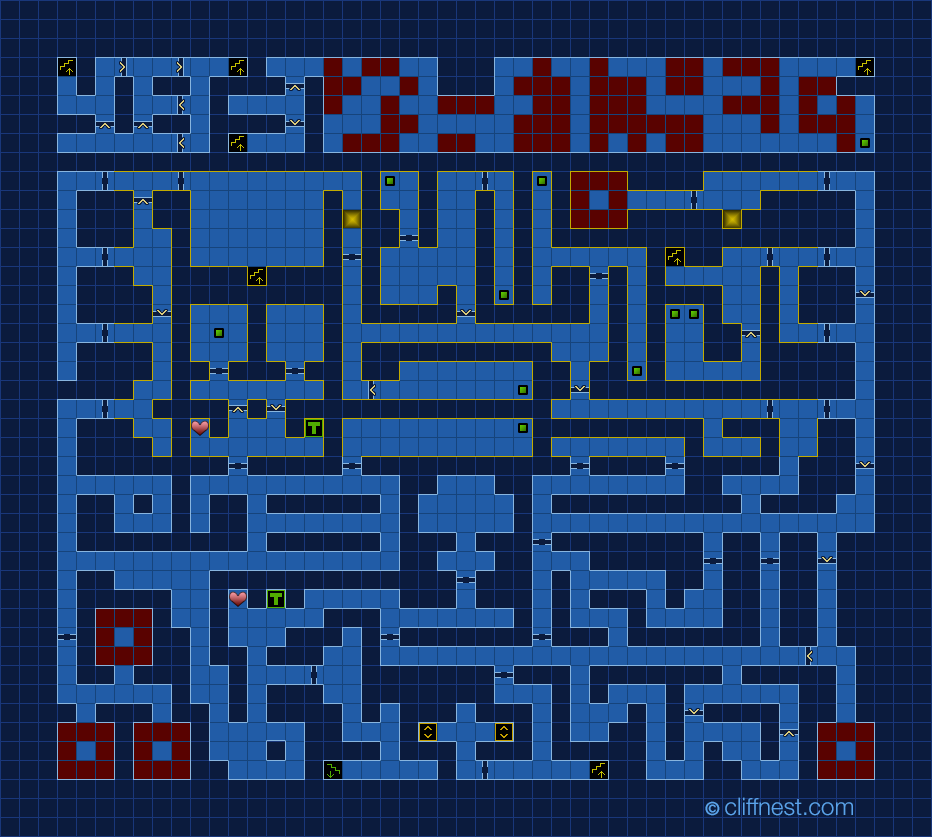

Leave a Reply